Wednesday, March 26, 2014

Pesto Goat Cheese Quiche

There are 3 things in cooking that make anything better - bacon, butter and goat cheese - at least in my mind they do. I didn't discover the beauty of goat cheese until I went to culinary school and learned this recipe. You can make with or without tomato and you can cut back on the goat cheese, but why would you.


Ingredients:
6 eggs
2 egg yolks
1 1/4 cup milk
1 tsp salt
1/2 tsp pepper
1 cup pesto
8 oz goat cheese
1 tomato, sliced thinly

Preparation:
Whisk together eggs, yolk, milk and salt and pepper. Add pesto and combine. Place egg/pesto mixture in crust that has been blind baked for 10 minutes. Mixture should not come to top of crust, and this is fine, because as soon as you add goat cheese, the mixture will come up higher. Break goat cheese into small pieces, about quarter size, and drop into mixture. Place around to different spots because where you drop it, is where it will set up and you don't want a huge blob of goat cheese (or maybe you do). Place thinly sliced tomato directly on top of egg/pesto/goat cheese mixture. Lay them flat around in a circle - they should sit right on top but the edges may sink a little.

Alternative is that you can put a base of thinly sliced tomato right onto your blind baked crust BEFORE you put in the egg/pesto mixture. The advantage to putting them on the bottom vs. the top is that sometimes they can dry out a little on the top.

Or you can completely forget the tomato.

Put quiche in 350 degree preheated oven and bake for 40 minutes. Egg mixture should be set and not look wet and runny. There should still be a little bit of jiggle to it. If there's no jiggle, that means it's overcooked. It will still have great flavor, but just be a little dry. Allow quiche to cool 10 minutes before slicing so that it will continue to set up and slice more neatly.

If you want to make individual quiches, bake for 20 minutes.


Monday, March 10, 2014

Make It Special with Moonrise

I love Moonrise Jewelry! You don't know what Moonrise Jewelry is? Well, neither did I until we moved to the Eastern Shore, and once you discover it, you are in for something truly special.

I first saw Meredith's work about 3 years ago - Meredith is the owner and designer - at a street festival and I was stunned by the beauty of her work. She's known for her "real orchids" which are literally real orchids preserved in resin. They come in all sorts of colors and sizes and you would think they would be heavy but they are about as light as a feather. We were so excited when Meredith opened her retail store here in Cape Charles and you can go in any day to see her amazing creations of necklaces, earrings, bracelets, cuff links, hair combs, and pendants. One of the great things about her work is she has something for all budgets - from $19 for Easton Earrings up to $349 for her Plantation or Bonaire Necklaces.

We've partnered with Moonrise for an exclusive package for guests of Fig Street Inn that can be added to your reservation and waiting in your room upon arrival. You'll receive a Mini Orchid Necklace (retail $54) and $25 gift certificate to Moonrise Jewelry for $75. Your someone special will have a spectacular gift waiting to be opened, and then they'll get to go to the store with their gift certificate to pick out another beautiful piece of jewelry. Or they can exchange the necklace and have a total of $75 to spend in the store.

What a great surprise and you'll look like a star - and we'll do all the work for you. We just need 2 days notice…it's as simple as you telling us when you make your reservation by phone at 757-331-3133 or when you reserve your room online, just select the add-on option. If you have a color preference, let us know. Necklaces come with an 18" sterling silver chain, or you can have a 16" or 20" chain. The necklace comes in a keepsake tin gift box that will be gift packaged.

If you're not sure what she'll like, we can have a gift certificate waiting - you tell us the amount - and then she can pick out her own handmade creation. Or if you find something on the Moonrise Jewelry website that you know she'll love, we can have that waiting instead.

It's all about making your visit to Cape Charles and Fig Street Inn a wonderful, unique experience - so you tell us what that something extra is that can make your time here even more memorable.

Moonrise Jewelry is located at 22 Strawberry Street in Cape Charles, Virginia. They are open Monday through Saturday; and have Sunday hours Memorial Day through Labor Day, and in December. Visit their website or follow them on Facebook.

Moonrise Jewelry


Tuesday, February 11, 2014

"H" is for Hazelnut Shortbread Cookies


Our weekly recipes have become something some of our local businesses here in Cape Charles, Virginia look forward to each week. We usually have more than enough for the students and teachers at the school we make them for, and we don't need to eat all the "left overs" ourselves, so we bring them around town. Some ask, "what are you making next week?"

When it came to planning for the letter "H", we tossed around a few ideas and then the owner of brown dog ice cream (who is always first stop for our leftovers deliveries) offered us hazelnuts from her shop. Sure! We can do something with hazelnuts. 

Well, who knew that hazelnuts need to be husked. Apparently a lot of people because there are plenty of articles online about the "best" way to do it. Not sure if there is a best way, but I will tell you that there is no easy way. So the process to make these cookies took quite a long time. If you want to make these, find hazelnuts that are already husked, or don't wait until 11 pm to make them like we did because it will take a lot longer.

 
Ingredients:

  • 3 cup all purpose flour
  • 1 1/2 teaspoon baking powder
  • 3/4 teaspoon salt
  • 1 1/2 cup (3 stick) unsalted butter, room temperature
  • 1 cup sugar
  • 1 1/2 cup finely ground, husked, toasted hazelnuts
  • 3 teaspoon vanilla extract

  • 8 ounces milk chocolate, chopped
  • 2/3 cup coarsely chopped husked toasted hazelnuts


Preparation:

Whisk flour, baking powder, and salt in medium bowl to blend. Using electric mixer, beat butter and sugar in large bowl until smooth. Beat in 1/2 cup finely ground hazelnuts and vanilla. Beat in flour mixture until just combined. 


Shape dough by tablespoonfuls into 3-inch-long logs onto cookie sheets lined with parchment paper. Bake 325°F until light golden brown around edges, about 20 minutes. Cool on baking sheet 5 minutes. Transfer to rack; cool cookies completely. 

Chocolate Topping:

Stir milk chocolate in top of double boiler over barely simmering water until melted and smooth. Remove from over water. Place 1/3 cup coarsely chopped hazelnuts in small bowl. Dip 1 end of cookie into melted chocolate, then into coarsely chopped hazelnuts. Return to rack. Repeat with remaining cookies. Let stand until chocolate is set, about 1 hour. (Cookies can be made 2 days ahead. Store in airtight container at room temperature.) 

We scooped our cookies and dropped about a teaspoonful of chocolate on the top, then sprinkled the chopped nuts. 

Thursday, January 30, 2014

"G" is for Gingersnaps

Greg will usually look at a recipe and then start changing it. Drives me insane because he just seems to wing it and things always turn out pretty darn good. For this recipe, he takes no credit. It comes from "Cookies Unlimited" by Nick Malgieri, page 194, published in 2000. Chef Malgieri takes no credit either, but received the recipe from the winner of a baking contest he judged. Greg's gotten rave reviews when he bakes these so it's no wonder these were the winning entry.  


The Good Cook's Gingersnaps

Ingredients:
2 cup flour
2 tsp baking soda
1/2 tsp salt
2 tsp ground ginger
1 tsp ground cinnamon
1/2 tsp ground cloves
12 Tbs unsalted butter (1 1/2 sticks)
1 cup sugar, plus 1/2 cup for finishing
1 large egg
1/4 cup molasses


Directions:
Combine flour, baking soda, salt and spices in bowl and mix together. In electric mixer with paddle attachment, beat butter and 1 cup sugar on medium speed for about 5 minutes until light and fluffy. Add egg and mix. Lower speed and beat in half the dry ingredients, then molasses. Scrape down sides of bowl and beater. Add remaining dry ingredients and mix. Remove bowl from mixer, scrape and do one final mix of dough by hand.

Place remaining 1/2 cup sugar in small, shallow bowl. Use small ice cream scoop to make 1-inch balls of dough. Round out balls of dough by rolling in your hands, and then roll each dough ball in sugar. Place on cookie sheets lined with parchment paper. Bake at 350 degrees for 15 to 20 minutes until cookies have spread, colored and surface crackles slightly. Cookies should be firm to touch. Slide paper from cookie sheet onto cooling rack, but leave cookies on paper for 5 more minutes before removing. Cookies will crisp up as they cool. If you try to pull them off immediately, they usually stick to the paper.

We recommend using a coarser sugar for rolling so that you can actually see the sugar after they've baked. If you use a extra fine or even just regular sugar, it soaks right in.

Okay, Greg couldn't resist making an adjustment, but that doesn't mean it's his recipe. He adds 1/4 tsp vanilla when he adds the egg. Greg likes adding vanilla to lots of things, but that's a whole other blog post in itself.

Friday, January 24, 2014

"F" is for Fudge

This recipe comes from Greg's grandmother. She used to make it all the time and I don't even want to think about how many pans we ate over the years. She would pour the "mix" into 2 metal pie pans and we'd watch it set up so we could cut into it as soon as we could. One pan would be gone pretty much instantaneously, and the second pan would stay around long enough for us to cut into the next morning for breakfast. That second pan was usually all gone by the end of that second day. You might be thinking fudge for breakfast sounds gross - but with a cup of coffee, yum. Give it a try (you know you want to).


Grandma G's Chocolate Fudge

Ingredients:
4 cup sugar
1 - 12 oz can evaporated milk
3/4 cup butter
1 lb chocolate chips
15 ounces mini marshmallows
1 tsp vanilla

Directions:
Bring sugar, evaporated milk, and butter to a boil. Stirring constantly, continue to boil until soft ball stage (235 to 240 degrees). Take off heat.

We boil until 237 or 238 degrees.

Add chocolate, marshmallows and vanilla and stir until smooth and marshmallows are completely melted (there should not be any white streaks of marshmallow). Pour immediately into a buttered dish.

Add in chocolate and marshmallows.
Immediately pour into buttered pan.


Allow to cool before slicing. You will want to slice the entire batch at one time. If you let the batch set completely and slice only as you need, it becomes more difficult. We let it sit for about 2 hours and then start cutting. But leave it in the pan and only take out the pre-sliced pieces as you serve. If your batch will last a few days (meaning you won't eat it all by yourself for dinner), you don't want to pull it all out because the sides can dry up.

When we make it, we use a 13x9 glass baking dish and cut into small pieces - about 3/4 inch square. Now that we're older and can't eat absolutely everything in sight without repercussions, it sticks around for a number of days. You can store in the refrigerator and then take out for about an hour before serving (or snacking). It softens as it comes up to room temperature. You can also store in air tight containers in the fridge for about one month. It will dry out a little.

It sets up quickly. Don't use a knife to spread out, or your top won't be as smooth.

Muffin papers add a nice touch for serving or if you want to give as a gift.


Thursday, December 12, 2013

"E" is for Eclairs

I worked as a pastry cook for Dessert Works Bakery when I came out of culinary school back when we lived in Boston, Massachusetts. Each week I was responsible for mini pastry. There were about 14 different types on the menu and everything was made from scratch - good stuff! Eclairs and cream puffs are made from pate a choux or choux paste (pronounced shoe). At the bakery, I would make this in large batches and then pipe out different shapes depending on what we needed that week. It's also used in a Gateau St. Honore - but that's a whole other blog of fantastically gorgeous, pastry beauty....I'll have to make one just to do a blog post!

The recipe here is a small batch and was one of the recipes we would have to know off the top of our heads - not just to be able to write down or recite, but able to execute properly. Yield all depends on how big or small you pipe the paste - about 12 large eclairs, or 30 small; or about 20 medium cream puffs.

For "E" day for our school project, we made small eclairs for the students, about 2-3 bites each. Perfect size the anyone.


Pate a Choux

Ingredients:

1 cup cold water
1/2 cup butter, cut into small pieces
3/4 tsp salt
1 cup flour
4 eggs*

Directions:
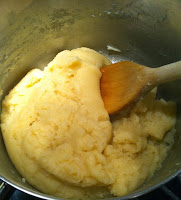
Bring water, butter and salt to boil in saucepan over medium heat. Butter needs to be completely melted. Take off heat and add flour. Stir with wooden spoon and return to medium heat to "dry out". Stir constantly as you lift mix off bottom of pan so it does not stick and burn. Cook for about 3-5 minutes until paste starts to get shiny from small beads of butter.
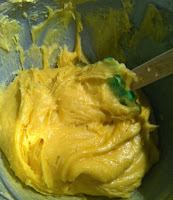

Place in electric mixer bowl and allow to cool slightly (about 10 minutes at room temperature). Add eggs* one at a time and beat on high to incorporate. There will most likely be steam coming from your bowl because batter is still a little hot - that's okay. The mixing will cool it down. Pastry should a little thick and "flop" off spoon - not just fall off (then it is too wet and you added too many eggs). It should stick to spoon but come off when you tap spoon on side of bowl.


*Depending on humidity, you may need more or less eggs, but you will always need at least three. The best thing to do after you have added your 3rd egg, is crack the 4th egg into a small bowl and mix. Slowly add that to the batter because you may not need all of it. If, after the 4th egg, you find that you still need a little more, repeat process with a 5th egg. You should not need to add a 6th egg.

Place paste in pastry bag. I use a #9 pastry tip for small eclairs and medium cream puffs. Pipe onto cookie sheets lined with parchment paper. If you are making different sizes or shapes, you will need to use different cookie sheets because they will cook at different rates.

Eclairs - preheat oven to 475 degrees. Place cookie sheet of piped eclairs in oven and reduce oven to 375 degrees. Bake 15 minutes (do not open door) until puffed, slightly colored and firm to the touch. Reduce heat to 325 degrees and bake for another 10 minutes to dry out the insides.

Cream Puffs - preheat oven to 475 degrees. Place cookie sheet of piped cream puffs in oven and reduce oven to 375 degrees. Bake 30 minutes (do not open door) until puffed, slightly colored and firm to the touch. Reduce heat to 300 degrees and bake for another 10 minutes (15 minutes if larger sized) to dry out the insides.

Whatever you decide to make, you want to use an egg wash. I usually cut my egg wash with a little bit of water so it's not as thick when brushing on. Brush on lightly before putting in oven.

Allow pastry to cool completely before filling. Paste will keep up to 3 days in refrigerator before piping. Store in air tight container with saran wrap right on top of paste so it does not dry out. Bring to room temperature before piping.

Once eclairs or cream puffs are made, you can store in fridge for up to 4 days before filling, or up to 4 months in freezer. They need to be wrapped tightly (in refrigerator or freezer). Allow to thaw from freezer before filling (literally only takes a few minutes). You can put in oven for about 2 minutes at 350 degrees to crisp up, but you will want them to cool before filling.

Stayed tuned for blog post on pastry filling and ganache......


Monday, December 2, 2013

"D" is for Donuts

This gave us the perfect opportunity to finally open (and use) the deep fryer we bought about 3 years ago. We just had to have the fryer, but it has sat on a shelf since then, box perfectly sealed.

This is really a recipe for beignets but we told the students they were New Orleans donuts. This was a slightly selfish project - we wanted to make beignets and we wanted to use the deep fryer. And who doesn't like something deep fried, especially something sweet and covered in powdered sugar.

Ingredients:
1 cup warm tap water, about 105-115 degrees
1/4 cup sugar
1 (1/4oz) packet of active yeast
1 large egg, lightly beaten
1 tsp vanilla
3/4 cup evaporated milk
1 tsp salt
2 Tbs butter
4 to 4 1/2 cups flour
Oil to coat a bowl, and for frying
Confectioners sugar for dusting

Directions:
In small bowl, combine water, sugar and yeast. Let sit for ten minutes to activate yeast. Meanwhile, in another small bowl, lightly beat egg, and add vanilla. In a double boiler, warm evaporated milk, salt and butter. Once butter has melted, slowly add egg/vanilla mixture.

In large bowl suitable for use with a dough hook, add 2 cups of flour, yeast mixture, warm milk mixture. Slowly mix until incorporated. Then add 1/2 cup of flour at time until incorporated and a soft dough comes together. You will add about another 2 to 2 1/2 cups, in 1/2 cup increments. Do not over work dough. Turn out dough into oiled bowl and cover bowl with cloth or plastic wrap. Refrigerate a minimum of 2 hours, preferably overnight.


Turn out dough onto well floured surface and knead 5 or 6 times. Depending on surface space, cut dough into 2 to 3 large pieces/balls. Roll dough balls out, one at a time, into 1/2 inch thick rectangle shape. Cut to desired sized squares, usually about 2 inches.


Pour oil into Dutch oven or fryer and heat to 375 degrees. Depending on size of oven or fryer add 4 to 6 pieces at a time. Leave space between pieces so that they are not hitting one another or overcrowded in the fryer. Cook one minute on each side, or until golden brown. Drain pieces and sprinkle with powdered sugar. Keep sprinkling. They will soak up a lot of sugar while they are hot, but you do want to do it while they are hot. The sugar won't stick once they have cooled. And then, just enjoy the deep fried goodness.

I remember going to Cafe du Monde in my former life when I worked for someone else and traveled all the time. Had many visits to New Orleans, and I remember the beignets being 3 for $1. Wonder how much they are now.